Version Jan 31st 2025
This wiki is intended as a place to find out up-to-date information on how to install microG on Sailfish OS (sfos) with Android AppSupport. Initially I’ve just copied over the information @DrYak’s excellent summary on TJC, but because this is an editable wiki, we all can keep it up-to-date.
Use these instructions at your own risk, and update the information if you find something has changed.
What is microG good for?
microG is an Open Source Software replacement for the proprietary Google Play Services, which some Android apps require to install or run properly, e.g. some online banking apps. For details read the excellent Wikipedia article about microG or microG’s own description. Having microG installed and configured should allow e.g. many banking apps work with AppSupport.
Donations
As a side note, if you would like to support the development of microG, you can do so via LibrePay or GitHub Sponsors.
Pre-requisites
Before starting, this is what you need:
- a supported device running Sailfish OS
- a paid license for the device
- Jolla Account set up in the device
- Android™ AppSupport 11 or 13 installed (depending on the device)
Note that developer mode is not needed for the typical install case.
If you have modified AppSupport, you may have to remove and re-install it. Note that this removes all Android application data from the device! For more details on the topic, see Removing Android AppSupport.
Allow running microG
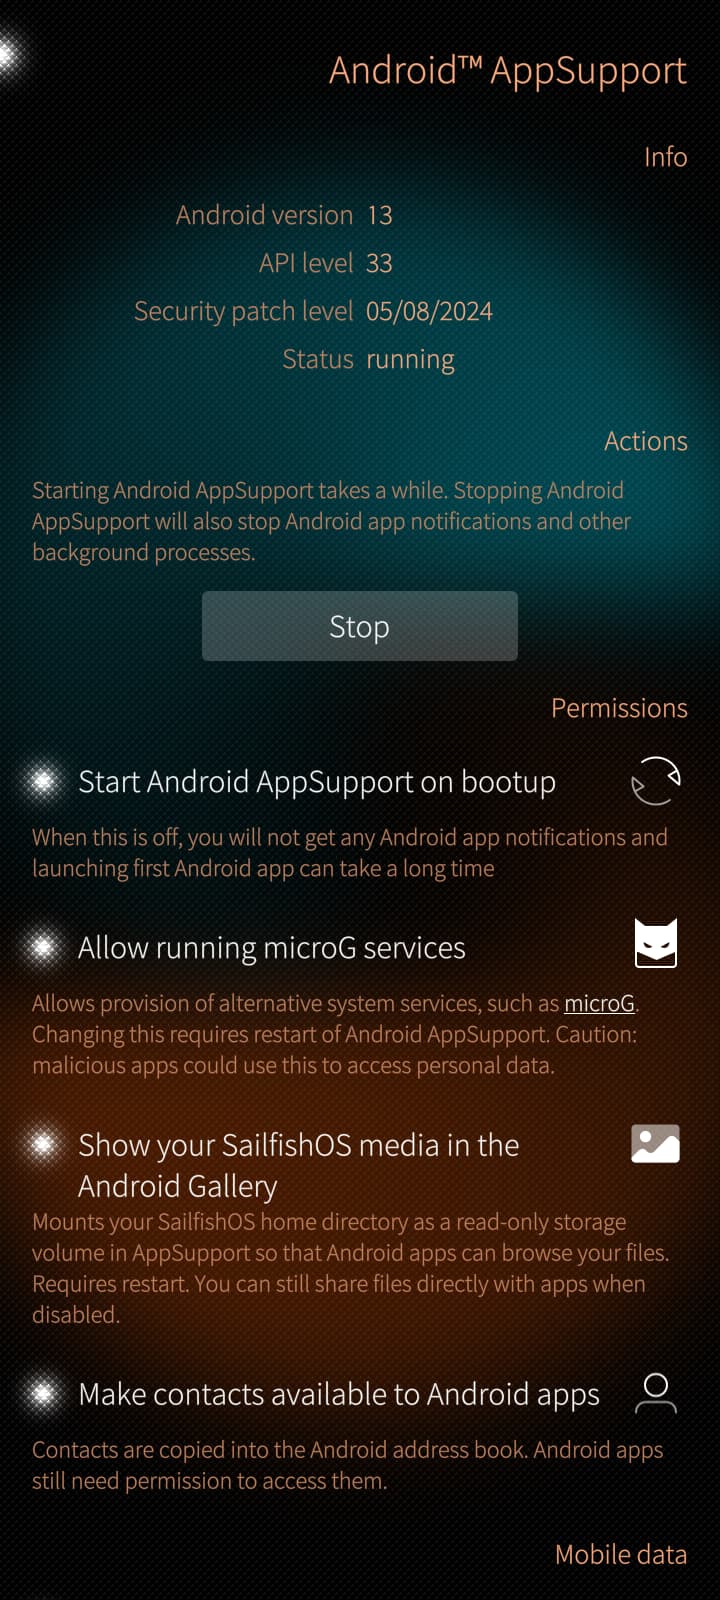
The first step is enabling microG usage in AppSupport. Go to Settings - Android™ AppSupport and enable Allow running microG services. Then restart AppSupport by clicking the Stop and Start on the page.
Install F-Droid
Now that AppSupport has been prepared, install F-Droid from Jolla Store. Also make sure to update F-Droid by checking for updates in F-Droid itself. This makes sure that F-Droid has the necessary permissions to install applications as well, so allow the permission in the Android settings view when presented.
Add microG repository to F-Droid
In order to have the microG packages available, we first have to add microG software repository to F-Droid. There are two ways to do this:
- Reading the QR code from another device
- Entering the repository manually
To read the QR code, first go to microG download page on your computer. On your phone, open F-Droid and go to Settings - Repositories and click the green plus sign. Then tap the SCAN QR CODE button, point the phone camera to the QR code on the screen and add the repository.
Or, if you can’t read the QR code from the screen of another device for some reason, you can enter the repository URL manually. Open F-Droid and go to Settings - Repositories and click the green plus sign. Then tap Enter repository URL manually and write the microG repository microG F-Droid repo the field and add the repository.
Installing microG packages
Now we’re finally ready to install microG packages! In F-Droid, go to Settings - Repositories and tap microG F-Droid repo to open it.
(If you want to verify the repository fingerprint, now is a good time to do it. You can find it in the bottom of the page. It should be identical to the one displayed in the microG download page.)
Tap SHOW APPS to see the three microG applications available:
- microG Services
- microG Companion
- microG Services Framework Proxy
Install the applications in the order above.
Granting permissions for microG
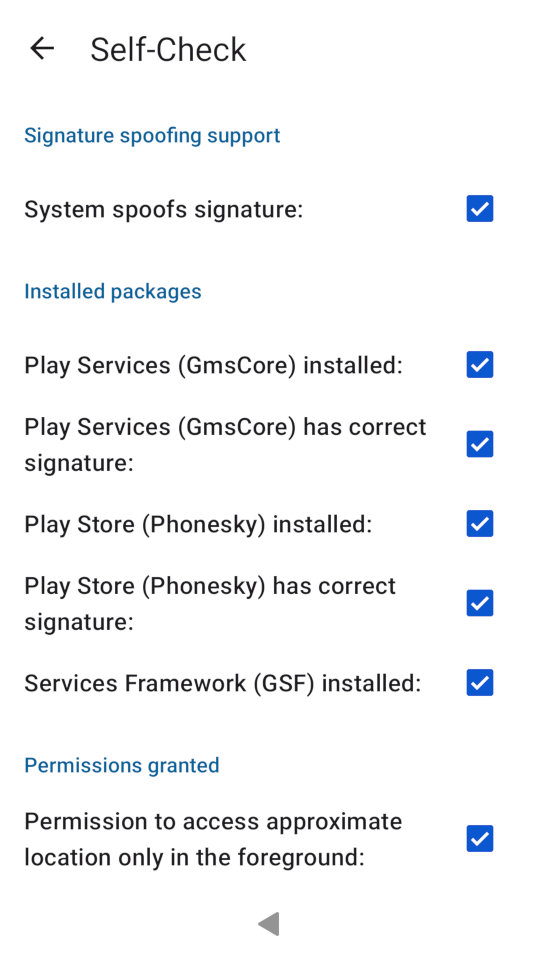
The last step is granting microG all the permissions it needs to function properly. Open the microG Settings application from the application launcher and tap Self-Check.
First, make sure that the first six checkboxes are all checked. Some of them are already checked, so you should only have to tap the System spoofs signature and Play Store (Phonesky) has correct signature" checkboxes and allow the permissions in their respective dialogs. Hint: tap the text, not the checkbox.
Finally, we need to give microG a selection of more typical permissions. Tap the permission texts/boxes one by one and allow the permissions. For some checkboxes, you may be presented with additional dialogs or an Android settings page. This is expected, so allow or add the permission in those dialogs and pages as well.
There’s one exception: notifications permission needs to be added manually. See Adjusting the settings of Android AppSupport of Sailfish OS for instructions.
The checkboxes should now all be checked like this:
Restart AppSupport
To make sure the permissions are in effect, restart AppSupport in Settings - Android™ AppSupport by clicking Stop and then Start. Then open microG Settings and tap Self-Check to make sure the checkboxes are still checked.
Additional applications
Now that microG is installed and configured, it’s feasible to install additional applications. Here are some examples.
- Aurora Store is a Google Play Store client available in Jolla Store and in F-Droid.
- Chromium-based web browser is required for some third-party applications to work properly, sadly won’t satisfy all applications. For example, MobilePay requires one for successful login. For this purpose you can install Vivaldi from Aurora Store (or directly from Vivaldi download page). There are other suitable browsers as well, Vivaldi is used as a tested and an available example here.
- For developers, Stanley (from F-Droid) lets you inspect installed applications, granted permissions and much more.
Advanced topics
Note: The following topics either need further testing, are outdated or possibly not even applicable any more. These are collapsed for brevity.
Configuring location services
microG allows customising the location settings and services it uses. Open “microG Settings” application and hit “Location”.
Here you can enable different location services. Selecting “Request from online service” from “Wi-Fi location” section, you can change the backend settings by hitting the triple-dot icon in the top right corner.
Note : Keep in mind that, as of 3.1.0 Seitseminen, Android app can see and query the WLAN (WiFi connection), but currently as demonstrated by several questions filed by other community members, the 3G/4G connection isn’t always seen by Android Apps.
Thus you need to only rely on WiFi Network-based connection e.g.: rely on Apple’s back-end. If you do not do that you’ll get the following problems:
- “UnifiedNLP has no last known location. This will cause some apps to fail.” (if no other back-end present)
- “UnifiedNLP do not have Location to test Geocoder - Please verify your location backend” (if no other back-end present)
- “No UnifiedNlp location was provided by the system within 10 seconds”. (always fails)
That because the back-ends that rely on 3G/4G cell hang.
Google Cloud Messaging
I’ve written another HOWTO about auto-starting apps. You might check how to enable/disable apps getting automatic alerts from the Cloud, and optionally getting auto-started to process it (e.g.: WhatsApp automatically getting messages instead of you needing to fetch them).
Apps that rely on Google Cloud Messaging and were already on the phone before you setup microG need to be installed again.
Google Play Store
Note: Using microG and Aurora Store is recommended instead!
This how-to is done for using an Open Source Software client app for browsing, fetching and installing APKs from the Google Play Store (such as aforementioned Aurora Store app) and the empty FakeStore package to trick any application that checks the presence of " com.android.vending ".
For people wanting to use the genuine Google Play Store client app (only needed in order to buy Android apps directly from within the Google Play Store client app), this is possible thanks to NanoDroid and carmeloferso’s guide:
- add nanodroid repository to F-Droid
- install Google Play Store from nanodroid
- grant it signature spoofing using the " enable system package replacement " permission
- in the Android Settings , in section " Users & accounts - Current user: Owner "
- add Google account (if not already set-up in microG).
- " Sign-in & security "
- Turn on " Trust Google for app permissions - When disabled, the user is asked before an app authorization {…} "
- Turn on " Allow apps to find accounts - When enabled, all applications on this devices will be able to see your Google Accounts "
- Start Google Play Store and let it sync.

