Fastboot flashing of a Jolla C2
1. Download the latest Sailfish OS release for C2
- Sign in to Jolla Shop with your Jolla username.
- Get the “Free Trial for supported devices” licence.
- Download the C2 zip file from the Downloads.
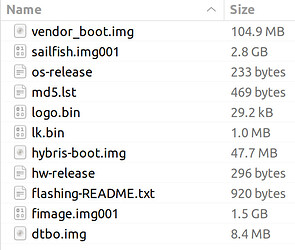
- Unzip the C2 zip file to your Linux computer. The following files (with approximately similar sizes) should appear:
2. Update the bootloader
If you have already updated your C2 to OS version 5.0.0.43 (or later), go to Chapter 3. The bootloader of your C2 is up to date.
The bootloader of some OS releases (5.0.0.29 or earlier) must be updated to allow fastboot flashing.
Copy the lk.bin from the C2 zip file to your C2 device (MTP/USB) and check that the md5sum matches.
[defaultuser@JollaC2 ~]$ md5sum lk.bin
20c0b9996de86994cebf55b9eaf74d15  lk.bin
Working as root on the C2 phone, copy the lk.bin to /boot/ and run the flash-bootloader script.
[defaultuser@JollaC2 ~]$ devel-su
Password:
[root@JollaC2 defaultuser]# cp lk.bin /boot/lk.bin
[root@JollaC2 defaultuser]# /var/lib/platform-updates/flash-bootloader.sh
Turn the phone off.
3. Install Sailfish OS with fastboot
NOTE: Flashing will delete all of your data on the phone. Copy valuable data to a safe storage outside of the phone.
When the C2 phone is off, press the Power key until you feel the vibrator play shortly. Release the Power key. Press and hold the Volume Down key. The phone should vibrate again.
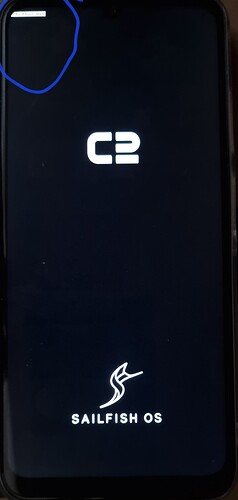
Check that the tiny “fastboot mode” text appears at the top left corner of the screen while the C2 and Sailfish OS logos appear in the middle (click on the “Picture” below).
Connect the phone with a USB cable to your Linux computer (*). Open a terminal on the computer to the folder where you unzipped the C2 zip file.
Give the following command in the terminal to check that the fastboot mode is okay. Your C2 should respond with a one-liner as below (with a different number, though).
$ sudo fastboot devices
21210112221590	 fastboot Data
If the command above failed (did not print anything)
If the previous command failed (did not print anything) you should install the fastboot tool on your computer.
Debian/Ubuntu/.deb distributions:
sudo apt-get install android-tools-fastboot
Fedora:
dnf install android-tools
OpenSUSE:
zypper install android-tools
Now, try again:
sudo fastboot devices
FLASHING TO START
Give the following commands one by one (‘sudo’ may not be necessary). We recommend copy-pasting the commands to avoid typos.
sudo fastboot flash boot_a hybris-boot.img
sudo fastboot flash boot_b hybris-boot.img
sudo fastboot flash vendor_boot_a vendor_boot.img
sudo fastboot flash vendor_boot_b vendor_boot.img
sudo fastboot flash dtbo_a dtbo.img
sudo fastboot flash dtbo_b dtbo.img
sudo fastboot flash userdata sailfish.img001
sudo fastboot flash super fimage.img001
The last two commands may take up to 3-4 minutes in total.
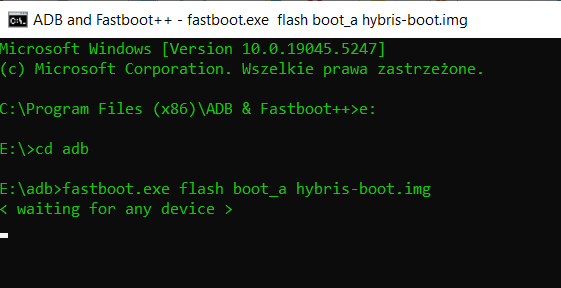
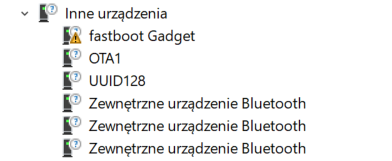
(*) Fastboot flashing also works on Windows computers with the Sony fastboot driver installed for Xperia phones! Install the driver in this way. You will need an Xperia phone to do it. You will also need to copy the two DLL files and fastboot.exe from an Xperia flashing folder to the C2 folder.
Command line view
Flashing output
$ sudo fastboot flash boot_a hybris-boot.img
[sudo] password for <username>:
Sending 'boot_a' (46560 KB)                        OKAY [  1.572s]
Writing 'boot_a'                                   OKAY [  0.280s]
Finished. Total time: 1.906s

$ sudo fastboot flash boot_b hybris-boot.img
Sending 'boot_b' (46560 KB)                        OKAY [  1.552s]
Writing 'boot_b'                                   OKAY [  0.253s]
Finished. Total time: 1.853s

$ sudo fastboot flash vendor_boot_a vendor_boot.img
Sending 'vendor_boot_a' (102400 KB)                OKAY [  3.471s]
Writing 'vendor_boot_a'                            OKAY [  0.603s]
Finished. Total time: 4.196s

$ sudo fastboot flash vendor_boot_b vendor_boot.img
Sending 'vendor_boot_b' (102400 KB)                OKAY [  3.266s]
Writing 'vendor_boot_b'                            OKAY [  0.564s]
Finished. Total time: 3.888s

$ sudo fastboot flash dtbo_a dtbo.img
Sending 'dtbo_a' (8192 KB)                         OKAY [  0.296s]
Writing 'dtbo_a'                                   OKAY [  0.151s]
Finished. Total time: 0.472s

$ sudo fastboot flash dtbo_b dtbo.img
Sending 'dtbo_b' (8192 KB)                         OKAY [  0.300s]
Writing 'dtbo_b'                                   OKAY [  0.142s]
Finished. Total time: 0.455s

$ sudo fastboot flash userdata sailfish.img001
Sending sparse 'userdata' 1/22 (131032 KB)         OKAY [  4.788s]
Writing 'userdata'                                 OKAY [  0.018s]
Sending sparse 'userdata' 2/22 (128199 KB)         OKAY [  5.456s]
Writing 'userdata'                                 OKAY [  0.011s]
Sending sparse 'userdata' 3/22 (120957 KB)         OKAY [  4.042s]
Writing 'userdata'                                 OKAY [  0.001s]
Sending sparse 'userdata' 4/22 (130851 KB)         OKAY [  4.680s]
Writing 'userdata'                                 OKAY [  0.006s]
Sending sparse 'userdata' 5/22 (129105 KB)         OKAY [  4.539s]
Writing 'userdata'                                 OKAY [  0.004s]
Sending sparse 'userdata' 6/22 (131070 KB)         OKAY [  5.102s]
Writing 'userdata'                                 OKAY [  0.004s]
Sending sparse 'userdata' 7/22 (131068 KB)         OKAY [  4.891s]
Writing 'userdata'                                 OKAY [  0.001s]
Sending sparse 'userdata' 8/22 (131068 KB)         OKAY [  4.675s]
Writing 'userdata'                                 OKAY [  0.001s]
Sending sparse 'userdata' 9/22 (117133 KB)         OKAY [  4.201s]
Writing 'userdata'                                 OKAY [  0.001s]
Sending sparse 'userdata' 10/22 (121840 KB)        OKAY [  4.411s]
Writing 'userdata'                                 OKAY [  0.008s]
Sending sparse 'userdata' 11/22 (130882 KB)        OKAY [  4.937s]
Writing 'userdata'                                 OKAY [  0.005s]
Sending sparse 'userdata' 12/22 (130980 KB)        OKAY [  5.138s]
Writing 'userdata'                                 OKAY [  0.008s]
Sending sparse 'userdata' 13/22 (131069 KB)        OKAY [  5.009s]
Writing 'userdata'                                 OKAY [  0.005s]
Sending sparse 'userdata' 14/22 (127027 KB)        OKAY [  4.614s]
Writing 'userdata'                                 OKAY [  0.006s]
Sending sparse 'userdata' 15/22 (131068 KB)        OKAY [  4.583s]
Writing 'userdata'                                 OKAY [  0.013s]
Sending sparse 'userdata' 16/22 (127993 KB)        OKAY [  4.449s]
Writing 'userdata'                                 OKAY [  0.006s]
Sending sparse 'userdata' 17/22 (117585 KB)        OKAY [  4.388s]
Writing 'userdata'                                 OKAY [  0.003s]
Sending sparse 'userdata' 18/22 (121588 KB)        OKAY [  4.508s]
Writing 'userdata'                                 OKAY [  0.001s]
Sending sparse 'userdata' 19/22 (129141 KB)        OKAY [  4.808s]
Writing 'userdata'                                 OKAY [  0.010s]
Sending sparse 'userdata' 20/22 (131021 KB)        OKAY [  4.648s]
Writing 'userdata'                                 OKAY [  0.001s]
Sending sparse 'userdata' 21/22 (130974 KB)        OKAY [  4.843s]
Writing 'userdata'                                 OKAY [  0.014s]
Sending sparse 'userdata' 22/22 (79404 KB)         OKAY [  2.785s]
Writing 'userdata'                                 OKAY [  0.013s]
Finished. Total time: 102.144s

$ sudo fastboot flash super fimage.img001
Sending sparse 'super' 1/11 (131068 KB)            OKAY [  5.018s]
Writing 'super'                                    OKAY [  0.008s]
Sending sparse 'super' 2/11 (131068 KB)            OKAY [  4.990s]
Writing 'super'                                    OKAY [  0.000s]
Sending sparse 'super' 3/11 (131068 KB)            OKAY [  4.852s]
Writing 'super'                                    OKAY [  0.004s]
Sending sparse 'super' 4/11 (131068 KB)            OKAY [  4.700s]
Writing 'super'                                    OKAY [  0.004s]
Sending sparse 'super' 5/11 (131068 KB)            OKAY [  4.859s]
Writing 'super'                                    OKAY [  0.004s]
Sending sparse 'super' 6/11 (131068 KB)            OKAY [  4.626s]
Writing 'super'                                    OKAY [  0.000s]
Sending sparse 'super' 7/11 (131068 KB)            OKAY [  4.908s]
Writing 'super'                                    OKAY [  0.005s]
Sending sparse 'super' 8/11 (131068 KB)            OKAY [  4.827s]
Writing 'super'                                    OKAY [  0.000s]
Sending sparse 'super' 9/11 (131068 KB)            OKAY [  4.959s]
Writing 'super'                                    OKAY [  0.006s]
Sending sparse 'super' 10/11 (131068 KB)           OKAY [  4.761s]
Writing 'super'                                    OKAY [  0.000s]
Sending sparse 'super' 11/11 (109792 KB)           OKAY [  3.978s]
Writing 'super'                                    OKAY [  0.006s]
Finished. Total time: 52.539s
Once done, give the command
fastboot reboot
and detach the USB cable.
The phone boots up to the Sailfish OS.


 I can’t thank you enough


 and thanks again for the help provided.