Subscribe to future posts here 
Sailfish OS update from Jolla
We had two major releases this last fortnight, plus plenty of community app releases too, so no shortage of material for the newsletter today. But with all of the activity it can be easy to miss important news, so please do let us know if you’d like something included in an upcoming newsletter. Thanks to all of the commenters on the last newsletter, the feedback is always appreciated.
So, the first major release from Jolla announced by Ville last Tuesday was of the new Developer Documentation site to replace our previous documentation wiki. I say “wiki”, but in practice editing was only available to Jolla employees, which made it harder for community members to contribute new material or fix errors.

We felt the site needed a bit of a refresh, but most importantly, we wanted to streamline the contribution process and make it more in-line with the other ways users can contribute to our open-source components. To this end, the source for the docs are now all stored publicly on GitHub in Markdown format. Everyone is welcome to submit pull requests for changes to the documentation, big or small, which the Jolla docs team will review. We feel strongly that using pull requests is a great way to collaborate, and we’re hoping it’ll allow a much faster and more effective turnaround on updates to the documentation.
Some effort has already been spent improving the documentation that’s there, but of course improving them is a continuous and ongoing process, so please do hit the “Edit this page” link if you see an error, or have some great idea for improvement.
The second major release is also one for developers. The Sailfish SDK 3.7 was released to Early Access subscribers on Wednesday last week. Crucially, this new version includes the build targets for Sailfish OS 4.3.0 Suomenlinna, and the emulator is raised to the same level as well.
There have also been other functional improvements, the headline features being for the sfdk command line operation, which now has bash autocomplete, and help pages rendered as man pages. If you’ve spent time on the unix command line, you’ll know how super-useful both of these changes are going to be. The sfdk commands can be quite convoluted and detailed at times, so having bash magically fill in the blanks of my poor ailing memory is going to be a big boon. Rendering the help as man pages will allow for better formatting and the standardised navigation that command-line dwellers expect.
There are of course also a whole host of bugfixes and smaller changes. One other change that’s relevant for this newsletter is that the Amber WebAuth documentation is also now included as part of the SDK, making F5 even more useful than it was before. And if that piques your interest, then hopefully you’ll enjoy our walkthrough of how to make use of the Amber WebAuth API below.
We have more community-app updates after the walkthrough, so feel free to skip ahead. I’d like to give special thanks to a couple of Sailors who helped with the newsletter this time. First chris.adams for his excellent WebView documentation which was such a massive help when writing the walkthrough. Second to vige who contributed the nice summary of the SFOS Forum Viewer that you’ll find below. Obviously it makes sense to cover the forum viewer in a newsletter that’s posted to the forum (maybe you’re reading this using Forum Viewer right now?), but vige also felt it deserved to be covered given it’s such a useful app that continues to be developed with great new features.
The new Amber OAuth API
In the last newsletter we took a look at some new features of the WebView API that was recently introduced as an official harbour-supported API. We thought we’d continue the theme this time by taking a look at the new Amber WebAuth API.
The Amber WebAuth API provides a way for apps to authenticate to an online service and gain authorisation for performing certain functions within that service. This is similar to what you do when you log in to a service on the website using your username and password: it grants the app the right to do things with your account on your behalf.
OAuth and OAuth2
At a more technical level, the WebAuth API provides a really easy way to integrate the client-side of the OAuth or OAuth2 protocols into your app. OAuth is similar to simply giving the app your username and password to access a service, but it’s far better from a security perspective because it provides limited-authorisation, delegated account access using revocable, app-specific, high-entropy machine-stored tokens. Let’s unpack that briefly. If your password is like root-access to your device, then OAuth will provide a token (a string of characters) that your app can use to access your account instead of your username and password. It’s called a token because the single string combines both your username and password. Unlike your password, it will only provide access to certain functions in your account (for example, read but not write access). Each app token will appear in your account, and you can revoke access through the web to any of the tokens at any time. So if you lose your phone, or an app goes rogue, you can prevent it doing any damage. Finally, because your phone remembers the password for you, unlike a password it can be really long and complex, making it much harder for an attacker to brute-force.
So, all in all, as a user it’s far preferable to use OAuth rather than handing over your username and password.
Mastodon
Since so many online services now require either OAuth or OAuth2 for accessing their backend authorisation, it made sense for us to support it as an OS-level API in Sailfish OS. Hence the Amber WebAuth API was born. The Amber WebAuth reference docs are already really good, with some nice examples. But we thought it would be helpful to go through a worked example, just to demonstrate how simple the process of using it really is.
So, in the sections below we’ll go step-by-step through the process of creating an OAuth2-capable Mastodon client. There are already some perfectly good Mastodon clients out there, including Tooter and Kyclos, and we don’t recommend using the code here instead of those; this is just an example.
Mastodon is an open-source fully-federated microblogging platform. In other words, it’s like Twitter, but you can host it yourself. Instead of posting tweets like on Twitter, on Mastodon you post toots. Like a mastodon! Any user on one Mastodon service can follow any user on another service, so just because you’re on one service, you’re not stuck in that service’s bubble. It’s really nice.
If you want to follow along with the example code below, you’ll need an account on some Mastodon service or other. It doesn’t really matter which one. We’re using mastodon.social, but you can use any service you like, you’ll just need to change the URLs in the examples to match.
With all of this preamble out of the way, let’s now get on to the main course of developing our Mastodon client.
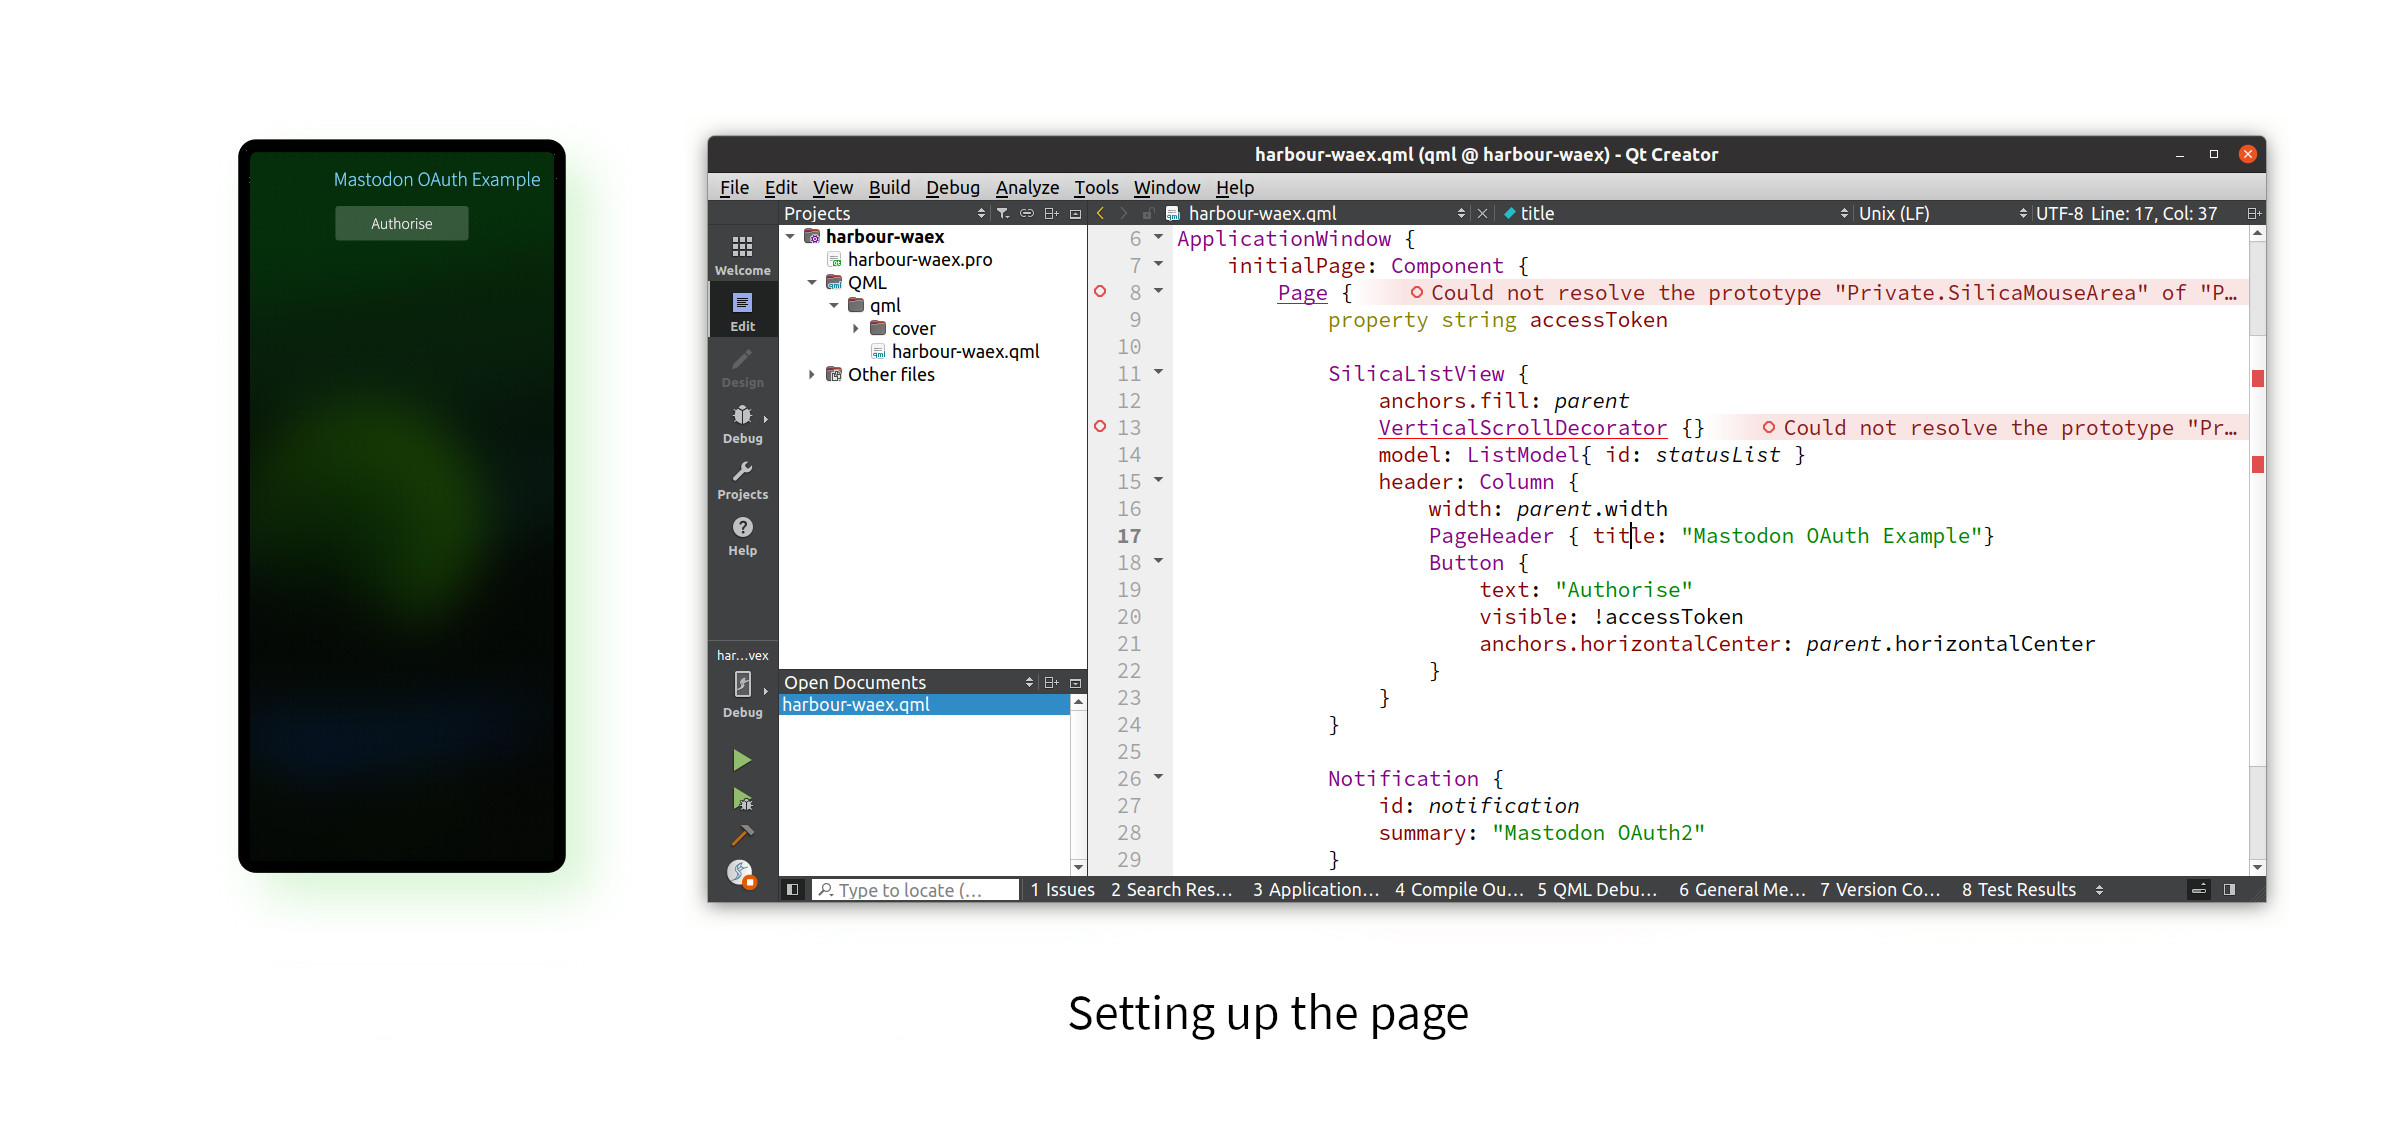
Setting up the page
As in the previous newsletter we’re going to be creating a QML-only app today. Let’s start by creating our main application page. This will have a header and a single button marked “Authorise” which we’ll use to kick off the authentication and authorisation process.
import QtQuick 2.0
import Sailfish.Silica 1.0
import Nemo.Notifications 1.0

ApplicationWindow {
    initialPage: Component {
        Page {
            property string accessToken

            SilicaListView {
                anchors.fill: parent
                VerticalScrollDecorator {}
                model: ListModel { id: statusList }
                header: Column {
                    width: parent.width
                    PageHeader { title: "Mastodon OAuth Example"}
                    Button {
                        text: "Authorise"
                        visible: !accessToken
                        anchors.horizontalCenter: parent.horizontalCenter
                    }
                }
            }

            Notification {
                id: notification
                summary: "Mastodon OAuth2"
            }
        }
    }
}
If you want to try this out in practice (I recommend you do) you can either create a QML-only project called harbour-waex using the Sailfish IDE and replace the root application page with the code above, or create a file /usr/share/harbour-waex.qml directly on your phone and copy the above code into it. You’ll need to be root to do the latter*.
You can already run this app, either using the IDE again, or by running the following at the command line on your phone.
sailfish-qml harbour-waex
Right now the button doesn’t do anything, but we’ll get to that.
You’ll notice there’s a bit more going on in the code than just a header and a button. For a start we’ve wrapped it in a SilicaListView. This isn’t needed yet, but by the end of this journey we’ll be displaying a list of toots, so we’ll need a scrollable list for this. There’s also a redundant Notification component there at the end. We’ll also use this later to give some feedback about the authorisation process. So don’t worry if these look a bit sad sitting there unused, they’ll all get their chance to do their thing later.
Register your OAuth2 app
So we now have an app, but it doesn’t do anything. The next step is the all-important bit of performing the authentication to the Mastadon service and authorising our app.
For an app to use OAuth, the app creator must first register the app with the service. In this example, you are both the app creator and the app user, so you’ll have to do this step as well. This can be done through the Web interface of your Mastodon service.
So, log in to your service if you’re not already, select Preferences, followed by Development, followed by New application.
Here you’ll need to fill out the application name (harbour-waex in our case) and ensure only the read scope is selected. Finally, in the Redirect URI field, we need to add http://127.0.0.1:7357. We’ll come back to this Redirect URI later.
The scopes represent the authorisation part of the process. The selected options are the capabilities your app will be authorised to perform on your behalf. We don’t want to be able to write toots or modify the account in any way, so we set our access to read-only by unticking all of the write-options. That way, our app can’t mess anything up, even if our coding goes awry.
Once you’ve filled out these details, hit the Save changes button at the bottom, and you’ll see your application now listed on the application page. Select the application in the list, and the page will come up again, but now with some important additional information.

To continue, you’ll need the Client key and Client secret shown on this page. Take a note of them, or keep the page open for the next bit.
Now is the big moment: we’re adding the all-important Amber WebAuth component to our app.
First, add the WebAuth import to the top of the page.
import Amber.Web.Authorization 1.0
If you’re working with the IDE, you’ll also need to add the following lines to your spec file:
Requires:   amber-web-authorization
Requires:   libamberwebauthorization
If you’re doing this direct from the command line on your phone, you’ll have to install these yourself manually, like this.
devel-su pkcon install amber-web-authorization libamberwebauthorization
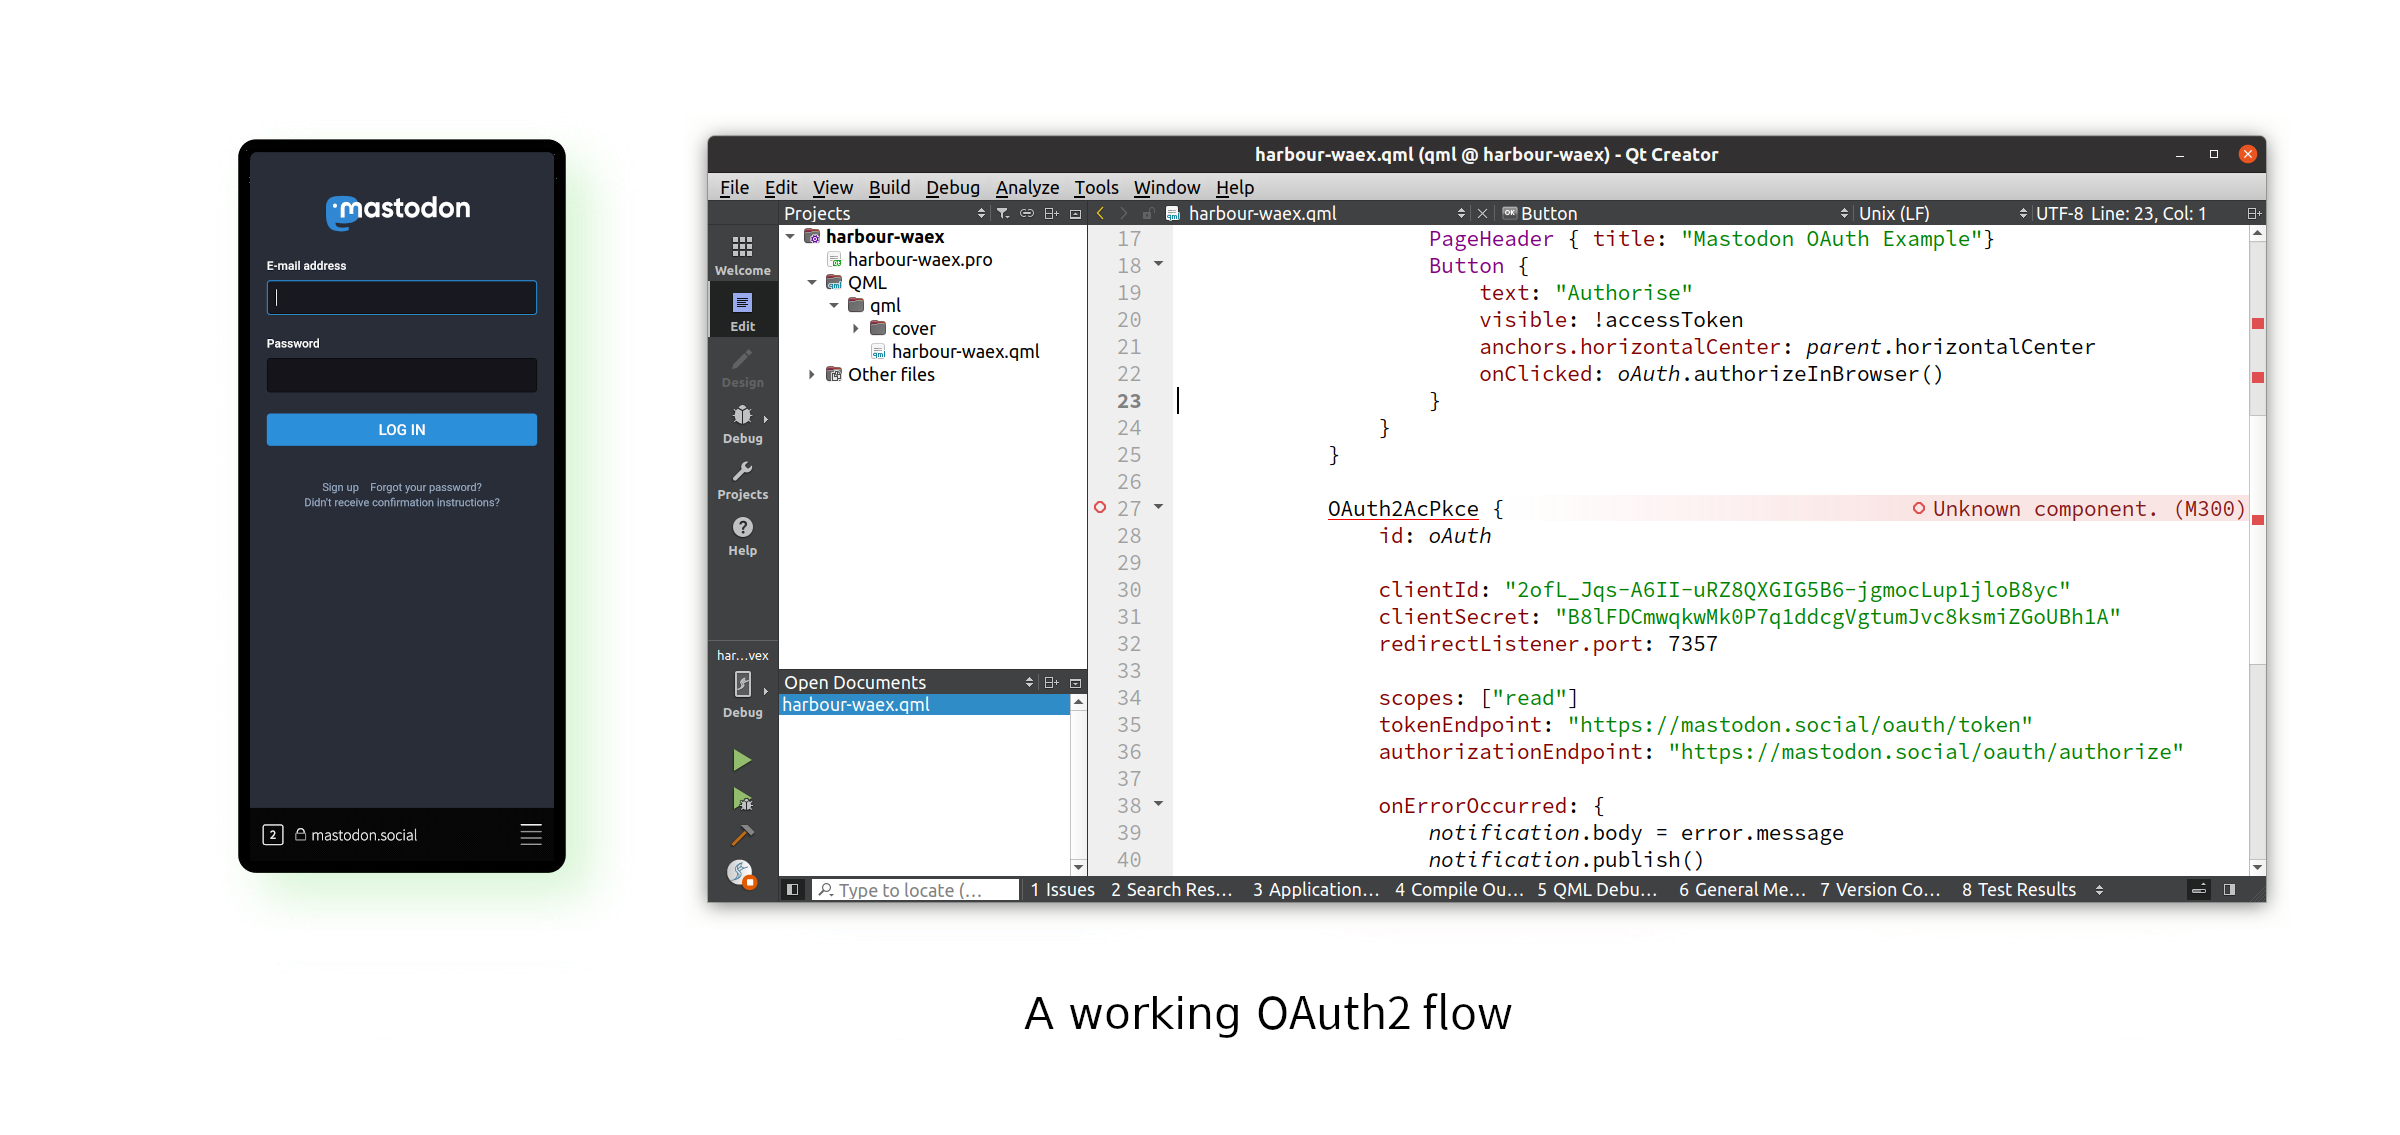
Authorise!
Now add the following OAuth2AcPkce component to your QML, inside the Page component and directly after the SilicaListView component.
OAuth2AcPkce {
    id: oAuth

    clientId: "2ofL_Jqs-A6II-uRZ8QXGIG5B6-jgmocLup1jloB8yc"
    clientSecret: "B8lFDCmwqkwMk0P7q1ddcgVgtumJvc8ksmiZGoUBh1A"
    redirectListener.port: 7357

    scopes: ["read"]
    tokenEndpoint: "https://mastodon.social/oauth/token"
    authorizationEndpoint: "https://mastodon.social/oauth/authorize"

    onErrorOccurred: {
        notification.body = error.message
        notification.publish()
    }

    onReceivedAccessToken: {
        accessToken = token.access_token
        notification.body = "Authorised"
        notification.publish()
    }
}
There is quite a lot going on here, so let’s unpack this too.
The OAuth2AcPkce component we’re using is the one you’ll most commonly want to use for services that support OAuth2. It bundles up a couple of more basic pieces of functionality that the WebAuth API provides. There are more details about this in the reference docs, but suffice to say, it’s usually the right option.
First the clientId and clientSecret. These are the values provided to you by your Mastodon service, so you’ll need to edit them to match the ones that your specific app should use. They allow the Mastodon service to recognise your app as being as instance of the harbour-waex app, so it can tie your app to the details you added on the page above.
Next up is the redirectListener.port. The OAuth2AcPkce component will in fact temporarily run a local web server on your phone, listening on this port. This allows the Mastodon service to communicate back to your app the secret needed for your app to complete the authorisation process. We set this value to 7357, to match the http://127.0.0.1:7357 value we added to the Redirect URI field earlier. We could have chosen any port likely to be available, but the two have to match.
It’s worth pointing out that the Mastodon service won’t connect to the web server directly, it’s actually your local Sailfish Browser which makes the connection. The connection between the two happens entirely on your device, so you don’t need to worry about opening any ports on our NAT, making it TLS-secured, or anything like that.
The scopes field tells the service what capabilities we want to use. We’re only allowed the one read capability because that’s how we configured our app earlier, so this is what we set it to.
The tokenEndpoint and authorizationEndpoint are the OAuth 2 endpoints provided by the Mastadon service.
If an error happens during the authorisation process the onErrorOccurred signal handler will be called. In our code here, we use the Notification component from earlier to display the error to the user.
Finally if everything goes to plan and the authorisation completes successfully the onReceivedAccessToken signal handler will be called with a token parameter. From this we can access the all-important token.access_token that we’ll need for all future calls to the service.
This access token is a string that will look like a random sequences of letters and numbers. Something like BNbuocIQ8hojwlYc0xVZLRYS1CZBOIqVXSDVOVvf0I8. When we make future calls to the service’s API, we’ll need to send this token as an HTTP Authorization header, like this:
Authorization:Bearer BNbuocIQ8hojwlYc0xVZLRYS1CZBOIqVXSDVOVvf0I8
We’ll show an example of how to do this shortly.
A real application would want to store this value for future use, so that the user doesn’t have to re-authenticate each time the app is run. The sensible place to store this is in your app’s configuration folder, since other sandboxed apps won’t have access to this.
Phew, that’s a bit much. But hopefully it all makes sense, and in practice setting up the OAuth2AcPkce component is mostly about filling out information provided by the service you want to connect to.
Finally, to get our authorisation up-and-running we’ll need something to trigger it. So we add oAuth.authorizeInBrowser() to the onClicked handler of the button we added earlier, so it now looks like this:
Button {
    text: "Authorise"
    visible: !accessToken
    anchors.horizontalCenter: parent.horizontalCenter
    onClicked: oAuth.authorizeInBrowser()
}
At this stage we we’re already in a position to have our app be authorised with the Mastodon service. Run the app, hit the Authorise button and you’ll find the Sailfish Browser opens up to the Mastodon login page. Enter your credentials and hit the Log in button. If all goes well, you should see the “Authorised” notification pop up on your phone.
The switch to the browser may feel a little clunky, but it’s actually a really important security feature. Not only does it allow you to check the URL and certificate of the Mastodon website are both correct, it also ensures you never give your password directly to the app itself. Recall that your username and password are like root, granting access to everything, while your app only has access to a smaller set of capabilities. If you gave your password directly to the app, a rogue app could store this and use it later to access any functionality it wanted, even if you were to revoke access to the app at some future date.
So it’s important to only give your password to the service itself, and the OAuth flow allows the user to ensure that this is the case.
Access!
We’ve done the hard part of authorising our app (well, not too hard, I hope), now let’s use our newly granted authorised powers to make our app do something useful.
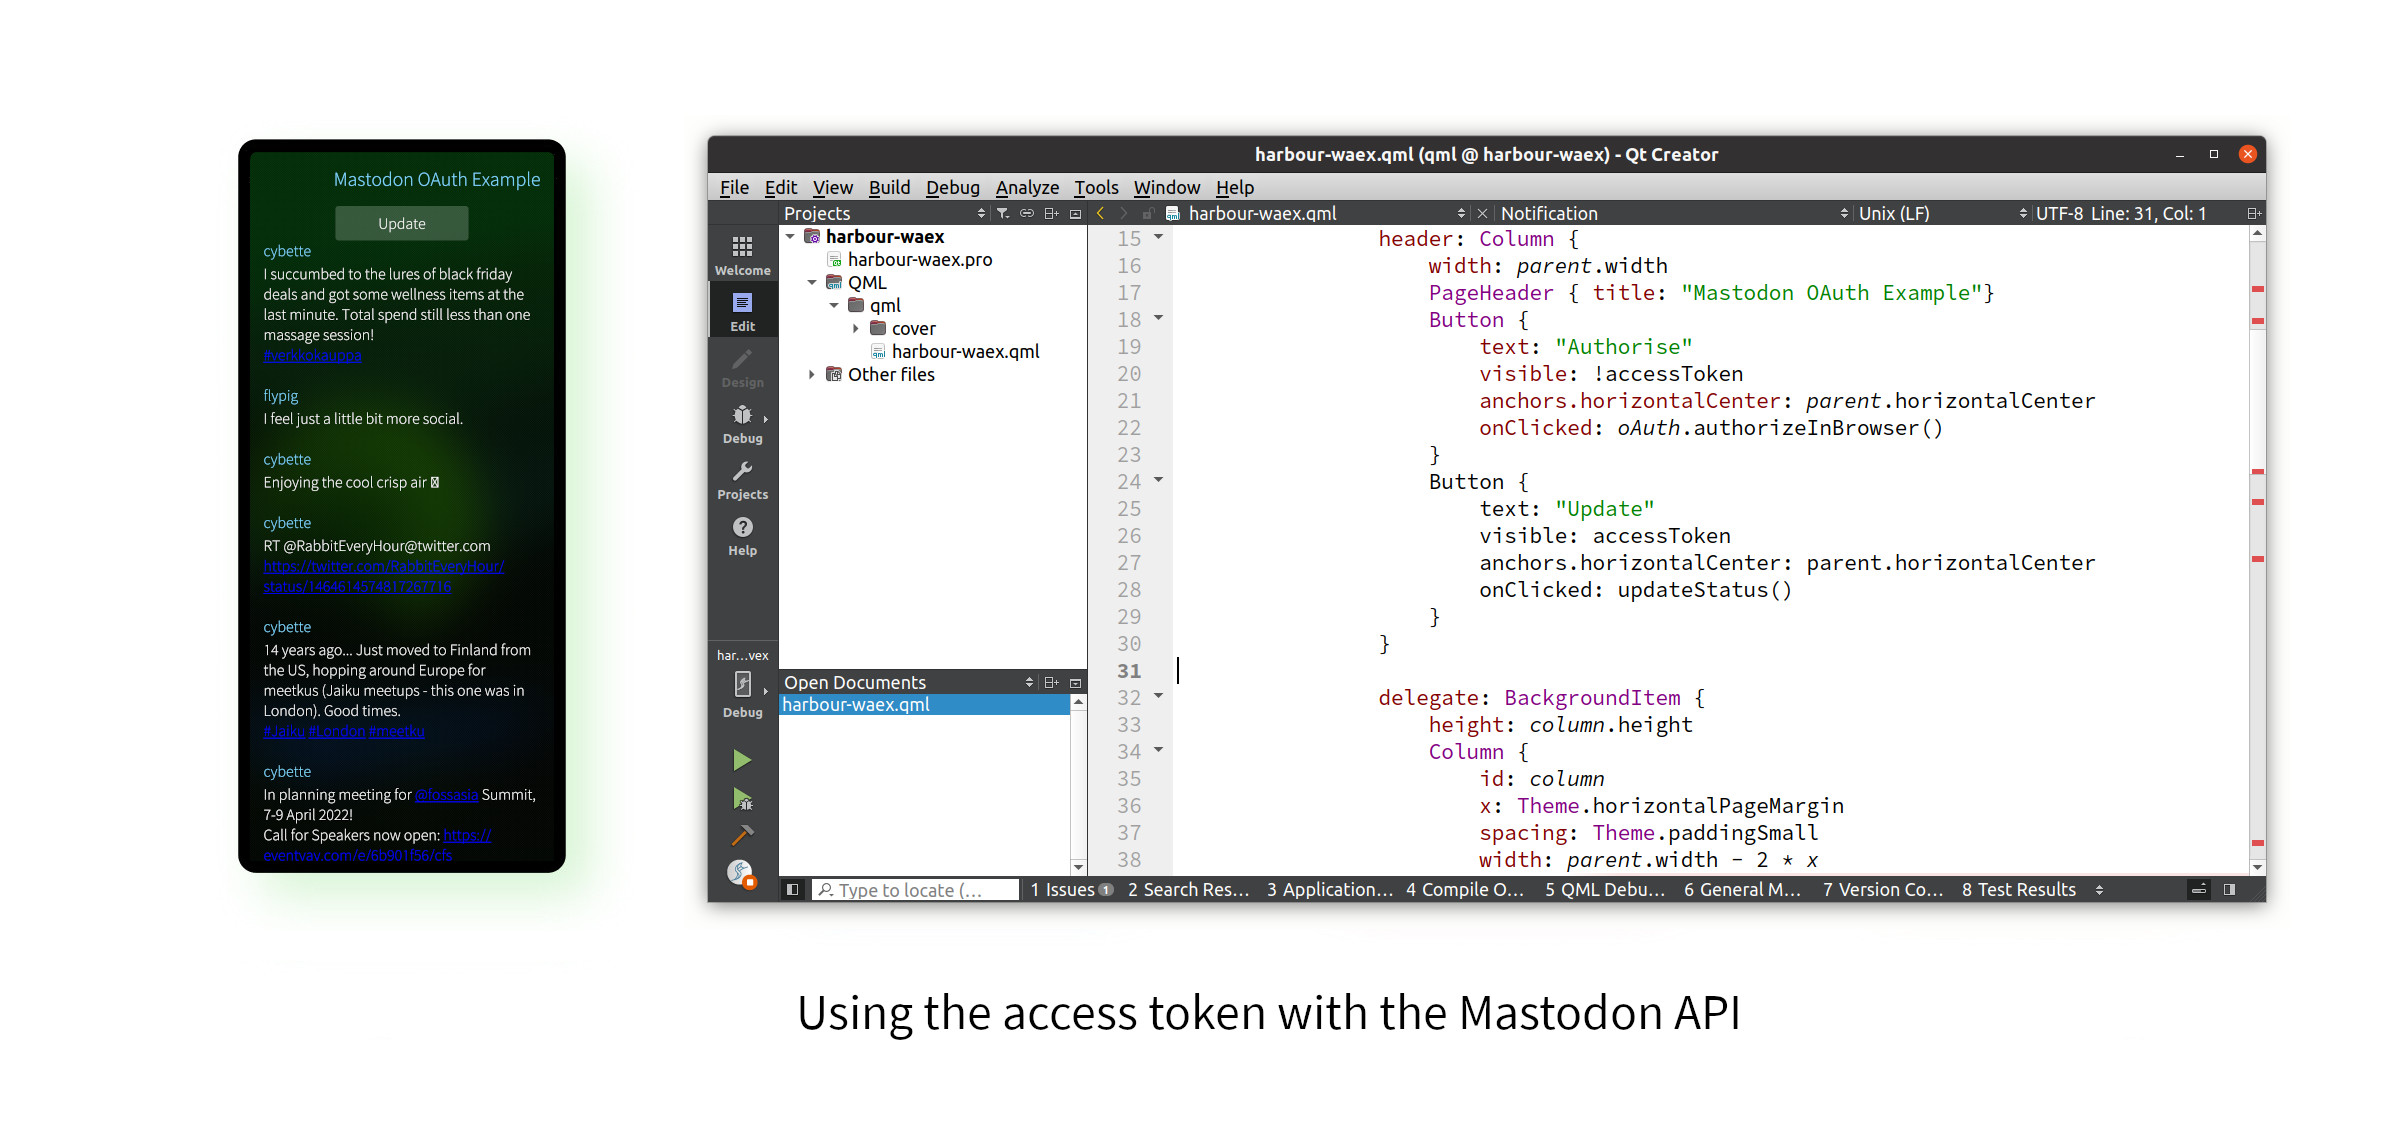
We want to display the latest toots from our timeline in the app. To do this we’ll need to format the toots using a couple of labels, one showing the name of the user tooting and the other showing the toot content itself. For this, we’ll add the following delegate to our SilicaListView component, directly after the header. This is all just UI formatting.
delegate: BackgroundItem {
    height: column.height
    Column {
        id: column
        x: Theme.horizontalPageMargin
        spacing: Theme.paddingSmall
        width: parent.width - 2 * x
        Label {
            text: account.username
            width: parent.width
            color: Theme.highlightColor
        }
        Label {
            text: content
            width: parent.width
            wrapMode: Text.Wrap
        }
    }
}
Next we’ll make use of our OAuth2 access token to call the Mastodon API and get the list of toots. Add the following function somewhere inside the Page component.
function updateStatus() {
    var req = new XMLHttpRequest()
    req.onreadystatechange = function() {
        if (req.readyState == XMLHttpRequest.DONE) {
            var timeline = JSON.parse(req.responseText)
            statusList.clear()
            for (var pos = 0; pos < timeline.length; pos++) {
                statusList.append(timeline[pos])
            }
        }
    }
    req.open("GET", "https://mastodon.social/api/v1/timelines/home")
    req.setRequestHeader("Authorization", "Bearer " + accessToken)
    req.send()
}
As you can see, this will send a GET request to the /api/v1/timelines/home endpoint of the service’s API. Crucially, we’re adding the accessToken that we collected earlier during authorisation to the request. Without this, the server would block our access. Note that here the token is equivalent to both the username and password, all contained in a single string.
The way the above function works, if the GET request is successful it will return with a JSON string containing all of the toots in the timeline, which we then append to our SilicaListView model to be displayed in the user interface.
Finally, we need to add some way to kick this process off. So we add the following button, just after the “Authorise” button from earler, inside the header Column.
Button {
    text: "Update"
    visible: accessToken
    anchors.horizontalCenter: parent.horizontalCenter
    onClicked: updateStatus()
}
When clicked, this button calls our updateStatus function. If all goes to plan, this will display the list of toots from the user’s account. It’s not especially pretty: dressing it up is left as an exercise for the reader!
Well done for getting this far, and a double-gold-star if you worked through the examples too. All of the code above, along with project files for the Sailfish IDE, are availabe on GitHub. We’ve covered rather a lot with this, but OAuth is such an important piece of the modern-app-development puzzle that we hope you’ll agree it was a worthwhile journey.
*Thanks to amaretzek for putting me straight on this in the last newsletter!
Energy from the Community
As always we have a nice selection of the latest and greatest and most recently updated apps for Sailfish OS. We’ve no doubt you’ll find something useful amongst the selection and hope you enjoy using them as much as we did. There are some real gems here.
One of the apps we look at below is Sailtrix, a native Matrix client. Some of you will also have noticed the release of Hydrogen to the Jolla Store this week. Hydrogen is a rather nice Matrix client with offline support amongst other features, so it would have been natural to look at this too. Unfortunately the release didn’t quite make it in time for the newsletter, but we promise to take a look at it in two weeks’ time.
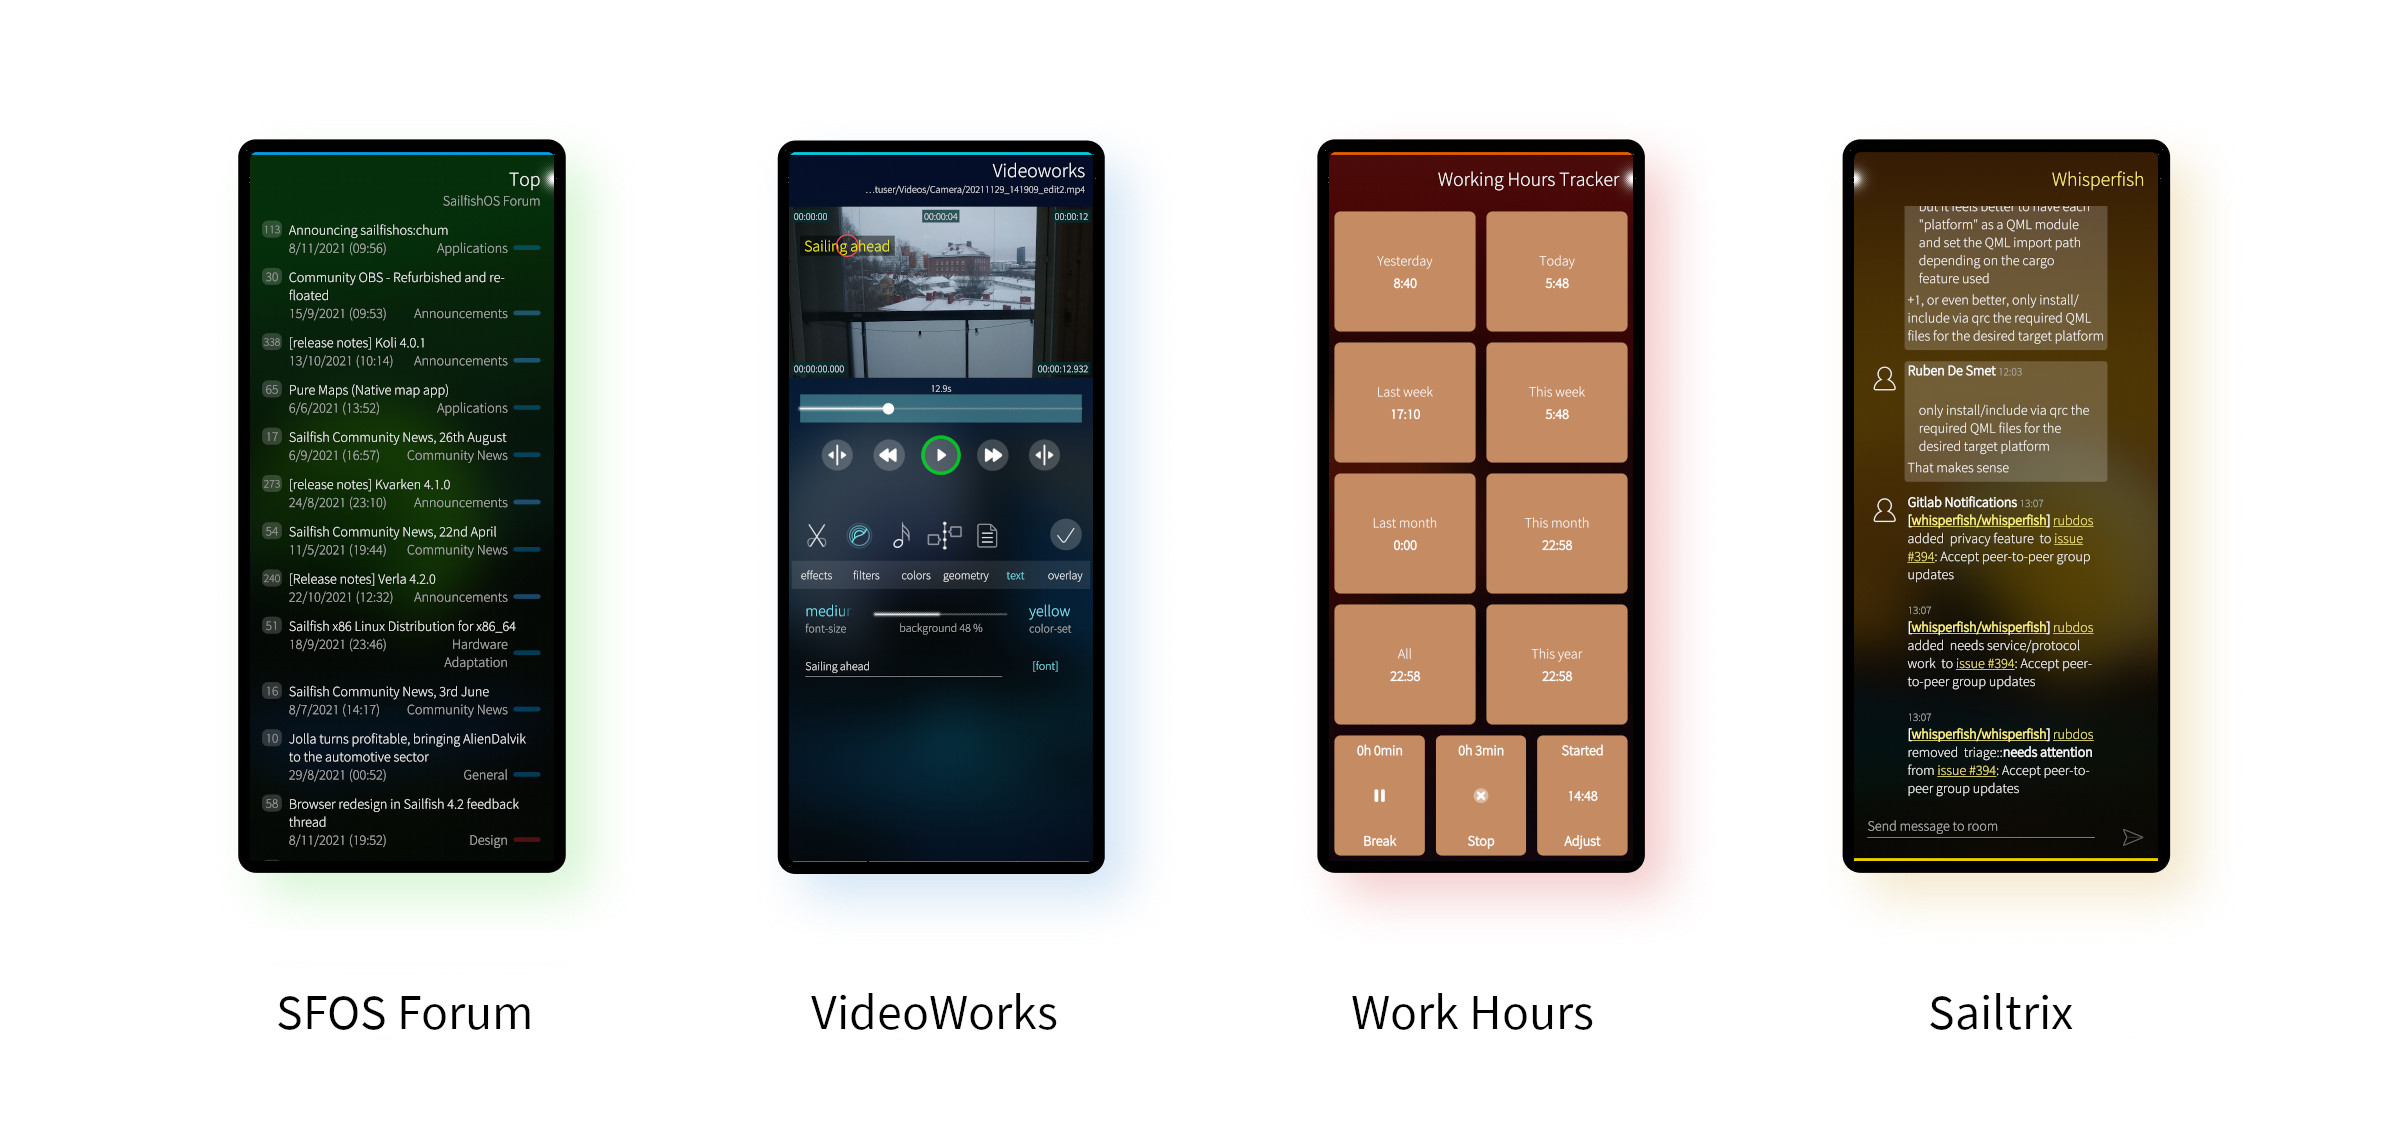
SFOS Forum Viewer
Two weeks ago we briefly mentioned the SFOS Forum Viewer by szopin. As the name suggests, SFOS Forum Viewer is a native viewer for the Sailfish OS Forum. Or at least, that’s how the project started. Nowadays, the app is no longer just a viewer app, but it has started transforming to become a more full-featured forum client. With the latest version, it’s also possible to write and like posts
When you start the app, you can see the list of topics with recent posts, much like when you browse the site using a web browser. You can select any of the topics to read the discussion there. The topics are color coded, based on whether you have read them and if there are new unread posts in them.
From the pull down menu you can find an option for logging in. After you have performed the login procedure, at first it seems nothing has changed. But when you open a topic, you will find a new option in the pull down menu: “Post reply”, which does exactly what it says. So no longer are we just viewing, now we can actively take part in the discussion! When you start a reply, the application adds the original post as a quote block - very convenient! Also, when you long press on a post, you will find that a menu opens with the possibility to like posts. So no need to fire up the browser for these tasks any longer!
When you swipe left, you get to see a list of categories on the forum, and you can select any of them to see only the topics on that category. There are two buttons on top: “Latest”, which gets you back to the list of latest posts, and “Top”, which gives you the most active topics for the past year. When you are viewing the posts from a single category, the pull down menu contains a new entry: “New thread”. This option lets you create a new topic; while they are called topics in the discourse lingo, they are called threads in the app.
You can grab a copy of SFOS Forum Viewer from Jolla Store or OpenRepos, but be aware that the version in Jolla Store is really outdated and lacks write support.
VideoWorks
VideoWorks was originally created by Tobias Planitzer, but maintenance and development was recently taken over by Mark Washeim (poetaster) whose name you’ll recognise from apps such as ImageWorks and SailGo which featured in earlier newsletters.
VideoWorks takes on the daunting task of editing videos on the dimensionally-challenged interface of your phone’s screen. My expectations were therefore not very high. But just like ImageWorks, VideoWorks surprises with the breadth of its functionality.
It supports trimming, cutting and rearranging sections of video. You can apply effects such as colour vibrance tweaking, mirroring, adding text and overlays, or adding in still-image slideshows. There’s even impressively advanced audio editing as well, with control over volume, filtering, fades and more.
The interface is kept simple by having a two-tier structure, not unlike a “Ribbon” interface. There are five top level icons, each of which expands out to up-to a further six suboptions. It’s nicely organised. Above the ribbon you have the video and video controls, below it the controls related to the currently selected function.
A common requirement is to select the beginning and end of a section to apply a particular function to. The slider control works pretty well for this, and although the interface seems to have been optimised for portrait use, you can always flip to landscape to get a longer slider and more fine-grained control.
Applying the effects can sometimes take a while, but that’s not unexpected on a phone and progress is shown nicely with a dimmed video overlay. There’s a distinct quality hit resulting from the added effects during preview, but these are all smoothed out when you save out the final version. Admittedly this final save can take a long time as a result, splitting this into preview and final-quality output makes good sense.
There are other useful features like undo, fast preview forward and back. It’s an impressive piece of software and unsurprisingly the underlying ffmpeg does an excellent job of processing the video files. I had a lot of fun trimming videos, adding captions and applying effects. Working on the restricted interface of the phone was nevertheless surprisingly usable. VideoWorks is a great piece of software that deserves a recommendation. It’s available from OpenRepos.
Working Hours Tracker
Olavi Haapala (olpe), author of the the Working Hours Tracker app, describes it as “an easy to use and simple Working Hours Tracker for Sailfish OS”. But I have to respectfully disagree. For while it certainly provides a way to track working hours, and is certainly easy to use, when it comes to features it’s by no means simple.
I mean this as a compliment though. When I read the description I was expecting to see something similar to a timer, with start, stop, pause. Maybe a history of durations for previous days. Working Hours Tracker provides all this of course, but it also provides more.
You can go back and edit previous days to adjust errors in your data collection. You can see a nice summaries of your previous periods clearly on the main screen, categories into weeks, months and years. Selecting one of them allows you to drill down in the the details. You can export all the data, or portions of the data as CSV files. You can also control the collection of data for the current day directly from the cover page.
It’s all really nice, but it gets really interesting when you start to look at projects and tasks. The app allows you to categories your worked hours to be apportioned amongst different projects, which you can provide visual hints (name, colour) so you can easily recognise them. Apply an hourly rate and you can immediately see not just how much time, but also how much money is associated with a particular project or task. Send out the results by email and view a full colour-coded log of every event that’s taken place so far.
In short, I was totally taken aback by the depth of detail in the app. If you have need to track your time, whether for work or otherwise, then this is a brilliant app that has a wealth of features, and it’s always right where you need it on your phone.
The latest version has updated translations and the ever-appreciated aarch64 build. It’s available from the Jolla Store and OpenRepos.
Sailtrix
Back in August when the sun was still shining we looked at Sailtrix, at-the-time the first native Matrix client to support end-to-end encryption. At that time we summarised it as “a really promising new Matrix client” but which needed “a little more maturity before it becomes usable as your only Matrix client”.
It’s pleasing to see development has continued apace with five (count them: five!) new releases between them and now. Impressive work from app author Heng Ye HengYeDev. Given the rapid pace of change I thought I’d give it another go. We use Matrix for communication internally at Jolla, but end-to-end encryption is a requirement.
In the previous version I’d experienced layout glitches and been unable to access several of the groups I’m enrolled in. I was therefore really pleased to see that both of these issues have now been ironed out. The app was smooth, glitch-free and felt both well-implemented and well-designed for Sailfish OS.
There is unfortunately still one missing feature that may be crucial for some people, and that’s device verification. For while the end-to-end encryption works as expected, there’s no way to verify the client against other sessions.
As noted earlier, the app has seen rapid development and is becoming a genuine alternative to the Web client or the Android workaround on Sailfish OS devices. This is one we’ll continue to keep an eye on. Sailtrix is available from OpenRepos.
Please feed us your news
This is a community update, and frankly we can’t always keep up with all the exciting stuff happening in the Sailfish community. Plus, the less of this we have to actually write ourselves the better. So please help us out by posting your Sailfish news updates to the forum as a reply to this post. We’ll collate as much of it as possible into one easily digestable post for the next update.
And don’t forget to join us at the community meeting every other Thursday on IRC. It’s a great place to discuss any of the content you see here, or to share your ideas for future updates. The next meeting will be on the 9th November, full details here.
